Configuring Site Policy in SharePoint 2013 using server code
In my previous post I covered topic of creating new Site Policy in SP2013 . In this post I will write about one approach to configuring Site Policy using server-side object model.
When you create Site Policy in SharePoint, you can configure its options using browser, which is particularly convenient when you have that policy configured for publishing in Content Type Hub. But, when you need to configure multiple sites with same policy, and you for any reason have to deploy multiple instances of same site policy, this browser-based editing process is not something that you would want to use. In that case, some way of configuring policy options automatically would be helpful.
One approach would be to set property XmlDocument attached to our Content Type when we are creating Project Policy, and that could be done during process of Policy Creation from Content Type. So here are steps to create custom ProjectPolicy that fits our needs.
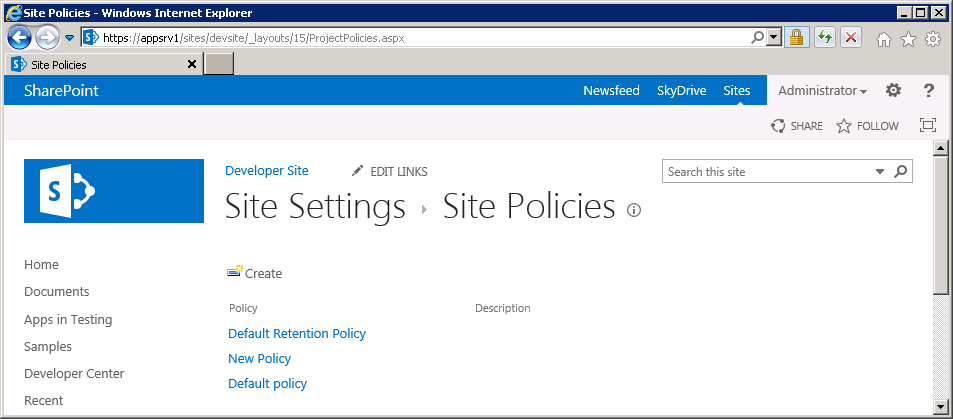
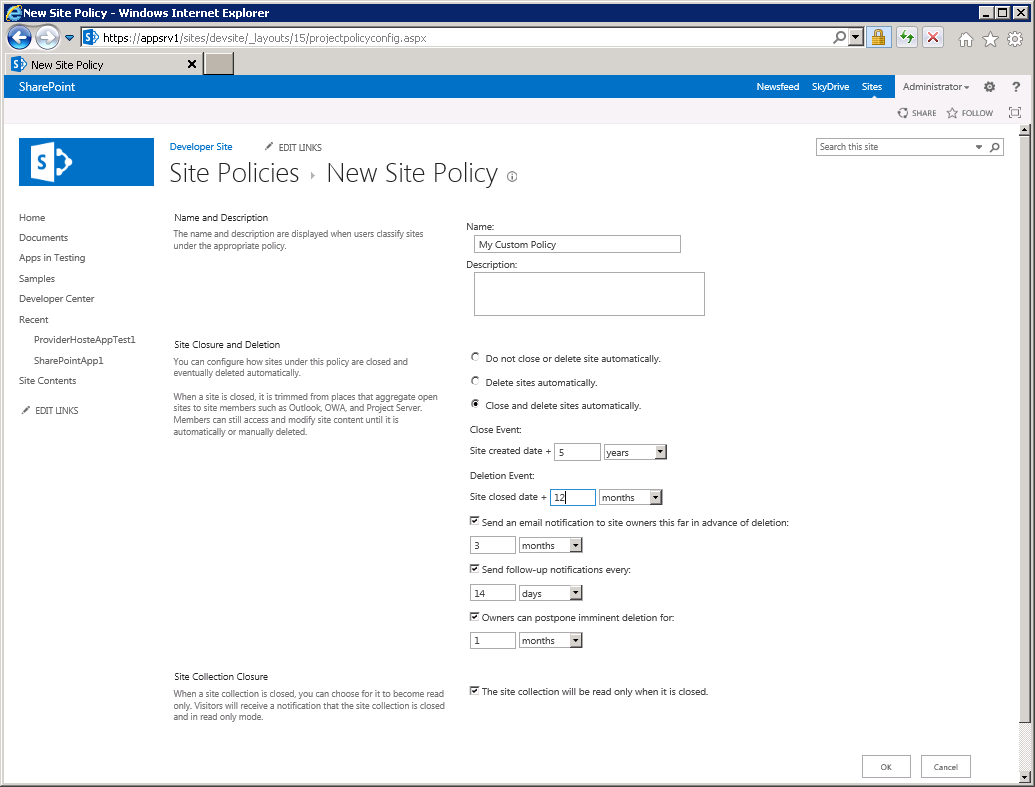
Create and customize New Project Policy using browser Go to Site Settings - Site Collection Administration - Site Policies. There you can create new Site Policy that matches your desired retention options (use"Create" button on top of the screen).
Read Project Policy XML from Policy Content Type In this step, we will use "SharePoint Manager" to read Project Policy configuration from XML file attached to Project Policy Content Type. Project Policies are created as "Hidden" content types. We need to open Project Policy we created in previous step,
 and to read "ProjectPolicy" xml from "XML Documents" collection of the content type (last option in SPM)
 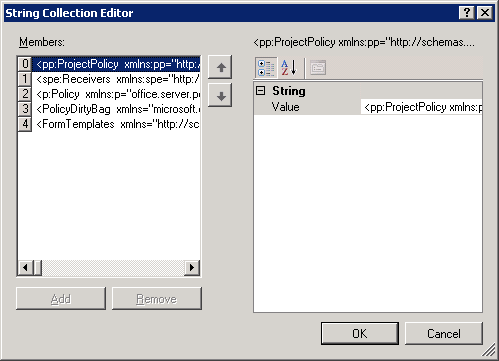 The retrieved XML for Policy we created in previous step looks like this (line breaks added for readability, see highlighted rows which contain options we set in the browser):
<pp:ProjectPolicy xmlns:pp="http://schemas.microsoft.com/office/server/projectpolicy" LastModified="10/27/2013 15:08:28">
CloseDelete 0 months False 0 months 5 years ProjectCloseDate 12 months True 3 months True 14 days True 1 months True </pp:ProjectPolicy> Use the retrieved XML Document to add it to XmlDocuments collection of new Project Policy we will create in Visual Studio. The code for creating Project Policy shown in previous blog post has to be modified in a way to replace Default ProjectPolicy XML document with the one we retrieved from Policy we created manually:
// ProjectPolicy Content Type ID SPContentTypeId policyCTID= new SPContentTypeId("0x010085EC78BE64F9478aAE3ED069093B9963"); SPContentTypeCollection contentTypes = site.RootWeb.ContentTypes; // ProjectPolicy is parent content type SPContentType parentContentType = contentTypes[policyCTID]; // we create new content type based on ProjectPolicy policyContentType = new SPContentType(parentContentType, contentTypes, "New Project Policy"); policyContentType = contentTypes.Add(policyContentType); policyContentType.Group = parentContentType.Group; policyContentType.Hidden = true; policyContentType.Update(); // Put retrieved XML to strDoc string variable string strDoc = // Create new XML Document XmlDocument xmlDoc = new XmlDocument(); xmlDoc.LoadXml(strDoc); // Replace default Project Policy XML in new content type with new XML we retrieved in step 2 from our Policy // we created in step 1 policyContentType.XmlDocuments.Delete("http://schemas.microsoft.com/office/server/projectpolicy"); policyContentType.XmlDocuments.Add(xmlDoc); // Update content type and create new policy object policyContentType.Update(); Policy.CreatePolicy(policyContentType, null);
It is important to mention that we can either create Project Policies in each of SharePoint site collections (where we need them, of course) or we can leverage Content Type Hub to have single source of Policies for our farm. The Policies are special kind of Content Types, and they can be created and published in Content Type Hub like any other Content Type.


